Ricoh GR III Metering Modes Explained: How Each Work.
This metering modes explanation also applies to the Ricoh GR III Street Edition, the Ricoh GR III Diary Edition and the Ricoh GR IIIx Urban Edition.
As photography enthusiasts, we understand that the successful exposure of an image lies at the intersection of aperture, shutter speed, and ISO. But the journey to achieving a perfect exposure begins with metering, an often misunderstood aspect of photography. In this article, we delve into the metering modes of the Ricoh GR III, a compact camera celebrated for its high-quality lens and exceptional image sensor.
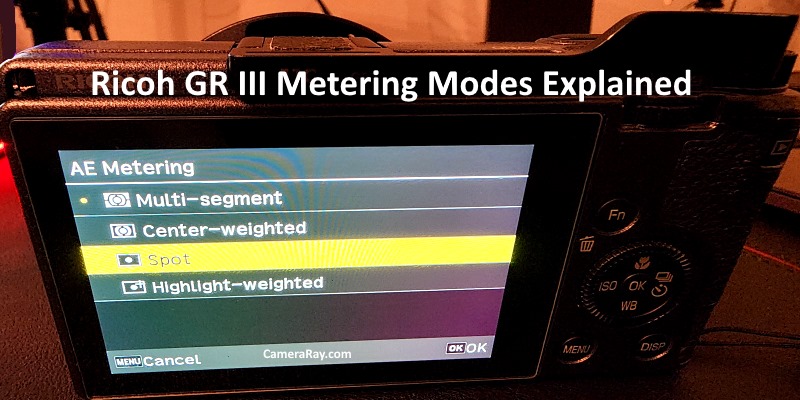
The Ricoh GR III, an upgrade to the popular GR II, is a beast hidden within a compact body. It boasts a 24.2 megapixel APS-C sensor, hybrid autofocus, and built-in stabilization. But an unsung hero of this camera is its advanced metering modes, designed to accurately measure light to ensure optimal exposure. The GR III offers three main metering modes: Multi-segment Metering, Centre-weighted Metering, and Spot Metering. Understanding these modes can take your photography to the next level.
Multi-segment Metering
This is the default mode on many cameras, including the GR III. Known also as evaluative or matrix metering, this mode divides the image into multiple zones, each independently analyzed for light and dark areas. The camera then calculates the best exposure for the overall image.
Multi-segment metering performs exceptionally well in evenly lit scenarios or when the subject is centrally located. For scenes with strong backlighting or high contrast, though, this method might not yield optimal results because it aims for an average exposure of the entire scene. But when in doubt, Multi-segment Metering is usually a safe bet.
Centre-weighted Metering
Centre-weighted metering gives priority to the middle portion of the frame while also considering the surrounding areas. This mode tends to be ideal when your subject is centrally placed in the image, and you want to ensure correct exposure for that subject.
With Centre-weighted metering, the Ricoh GR III gives more weight to the light information collected in the central area of the image. While this mode isn’t influenced by extremely bright or dark areas at the edge of the frame, it can lead to under or overexposed backgrounds if the subject’s brightness significantly differs from the rest of the scene.
Spot Metering
For the most precise control over metering, the Ricoh GR III offers Spot Metering. This mode measures a very small area of the frame, typically a small circle in the center. Spot Metering is excellent for high contrast scenes, allowing you to focus on your main subject and ignore the rest of the frame, effectively handling situations where other metering modes might struggle.
It’s essential to be cautious when using Spot Metering. Because of its precision, if aimed incorrectly, it could result in poorly exposed images. It’s most useful when you have a clear understanding of the lighting conditions of your specific subject, separate from the rest of the scene.
You may also want to take a look at the best accessories for your Ricoh GR III.
In the Ricoh GR III, you can also use Spot Metering in conjunction with AE Lock (Auto Exposure Lock). By doing this, you can meter the light for your chosen focus point, lock the exposure, and then recompose your shot without losing those exposure settings. This is particularly beneficial in scenarios where you need to meter a particular subject but want it positioned off-center in your final composition.
The Ricoh GR III’s metering modes allow photographers to make the most of every lighting scenario, thereby enhancing the camera’s already impressive capabilities. By understanding how each mode interprets light, you can take control of your exposure settings and capture the best possible images. Remember, no one mode is superior to the others; it’s about choosing the right tool for the job, and sometimes, that means switching metering modes based on your scene. With practice and experience, you’ll develop an instinct for which metering mode is best for a particular scene.
More info about the Ricoh GR III camera here.
For instance, when shooting a landscape on a day with even lighting, Multi-segment Metering will likely serve you well, providing a balanced exposure across the entire scene. Alternatively, if you’re capturing a portrait with a strongly backlit subject, Centre-weighted or Spot Metering may be a better choice to ensure that the subject is correctly exposed, even if it means the background becomes overexposed.
Also, remember that these metering modes are not infallible, and you might sometimes need to make additional adjustments. This is where exposure compensation comes into play. With the Ricoh GR III, you can quickly dial in exposure compensation to tweak the camera’s suggested settings, giving you more control over your image’s final look.
Knowing how to navigate the Ricoh GR III’s metering modes is about understanding the strengths and limitations of each. It’s an essential step in moving away from auto modes and taking full creative control over your photography. However, like any tool, its effectiveness depends on the skill and knowledge of the user.
Practice is critical. Take the same shot using different metering modes to see how each affects the final image. Experiment with challenging lighting conditions. Play around with the AE Lock function in combination with Spot Metering. Over time, you’ll learn to gauge which metering mode will deliver the best results in a given situation.
The Ricoh GR III, with its compact size and powerful features, including its flexible metering modes, truly shines as a camera that caters to photographers who value both convenience and quality. By mastering these metering modes, you can ensure that your images reflect your vision, rather than relying solely on the camera’s automatic settings.
To conclude, the Ricoh GR III’s metering modes are more than mere features—they are pivotal for successful exposure, and thus the creation of beautiful photographs. Dive into them, experiment, and in the process, enhance your photography skills and the quality of your work.
Please take a look at the best accessories for your Ricoh GR III.
Thanks for the helpful article. The scrolling is all jittery and broken on your website, using safari browser.
Sorry. Thanks for the info but I have no problems when using Safari.